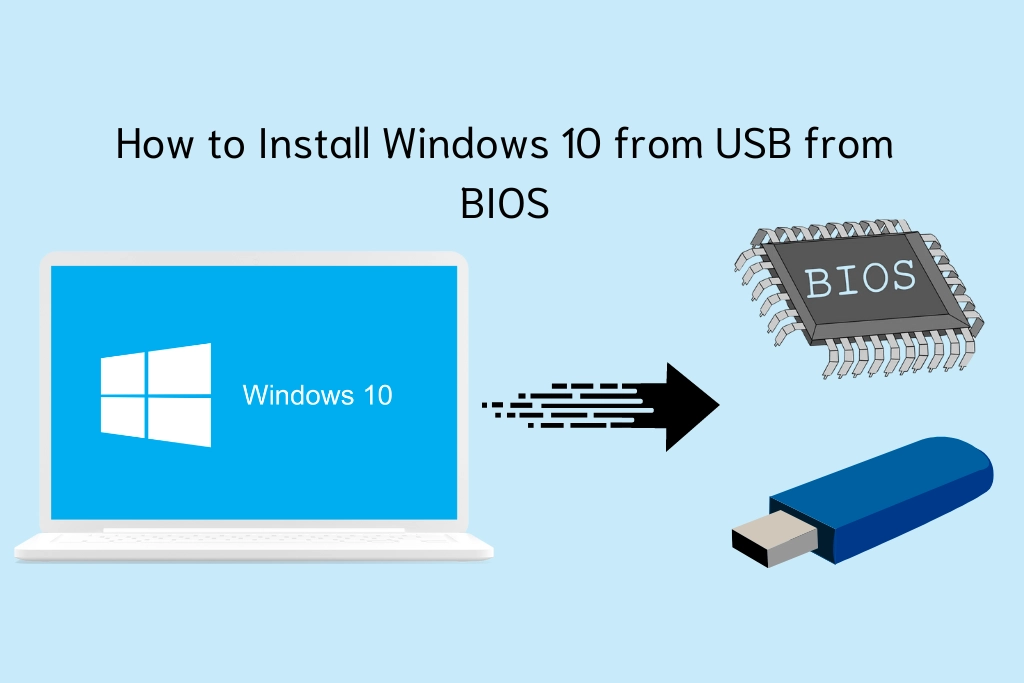
If you are using Windows 10 on your system and your Windows has run into errors or it is not working fine as you expect it to work. The only solution here is that you can try reinstalling it. An easy and simple way is to install Windows 10 via a bootable USB drive. Now, the question here is do you know how to install Windows 10 from USB from BIOS? Whichever your answer is, here in this article from Rufus.com.in, I shall give you a detailed guide on how to do that.
But, before knowing the complete procedure let us tell you the requirements that you need in order to fulfill for a successful Windows 10 installation from USB. Also, I will tell you about an efficient tool called Rufus. Read the complete article to learn how to install Windows 10 from a USB easily.
Can You Install Windows 10 from BIOS with USB
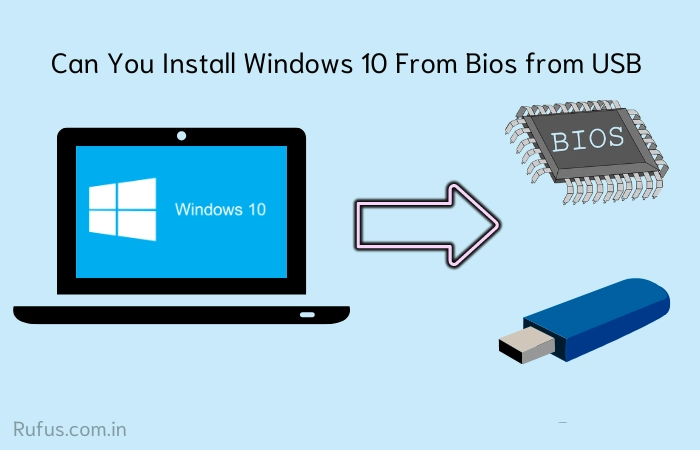
You can not install Windows 10 from BIOS but it is possible from a bootable USB drive. However, BIOS is important for Windows because it is where you select the boot order for your installation. After connecting the bootable USB drive to your computer, BIOS helps recognize the boot files essential for a successful Windows 10 installation.
Let me also make it clear that there are specific keys to enter BIOS settings on your computer. The keys depend on the model of your computer e., Dell, HP, ASUS, Lenovo, MSI, etc. Common keys are ESC, DEL, F2, or F10 keys.
What You Need to Install Windows from a USB Drive
You will need to make sure that you have these things and also that you do them correctly as well to get Windows 10 installed from a USB drive:
- USB flash drive: You will need a USB flash drive that is in working condition and you must have at least 8GB of free space available in that particular drive.
- Computer with BIOS: You need a computer with a BIOS that can boot from a USB drive for installing the OS.
- Stable Internet connection: Also, make sure you have a stable internet connection to download the necessary installation files from Microsoft servers.
- Create a Windows bootable USB drive: To create a Windows bootable USB drive, you will have to use software like the Windows Media Creation tool. Another option is Rufus, a professional bootable USB drive Creator software that simplifies the process without the need for manual downloading of ISO files.
Rufus will help you save time by eliminating the manual creation of Windows 10 installation media. Also, it bypasses the minimal requirements typically needed before Windows installation. Another impressive quality of Rufus is that it can install two operating systems on a single computer (Multi-Boot). Other than this below are some key highlights of this powerful tool, take a look at them:
RUFUS – Create Bootable USB Drives
- With this tool, you can install Windows 10 without a Microsoft account.
- You can install Windows on a Mac without boot camp.
- Installation of Windows 11 without secure boot and TPM is possible.
- Functionality to clone Windows to a USB as a portable Windows.
How to Install Windows 10 from USB Using BIOS
As we talked about this before in the above section, reinstalling Windows 10 is not done through the BIOS, instead, you will have to use a bootable USB drive. Therefore, first, we will create a bootable flash drive with the help of Rufus. Let me explain to you in detail how you can create a bootable USB Flash Drive which can install Windows 10 on a system.
First of all, you will have to download Windows 10 ISO file which you can do from the official Microsoft Website (Here). Also, in order to create bootable USB drives you will need to download Rufus and then use it.
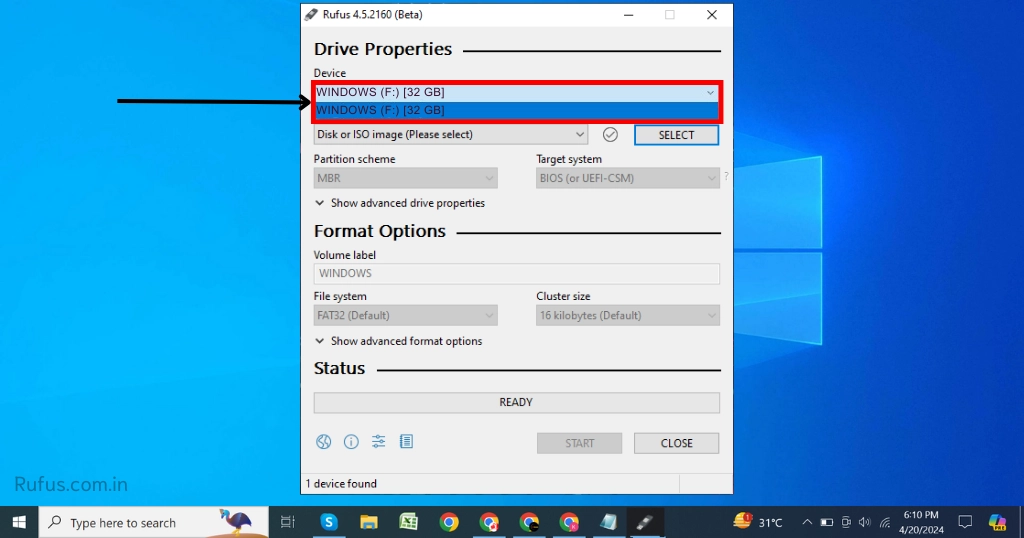
After downloading both the things required, just plug in the USB and then start off Rufus Portable and it will automatically detect the USB Flash Drive. If we have multiple devices plugged in you can select it in the device drop-down section.
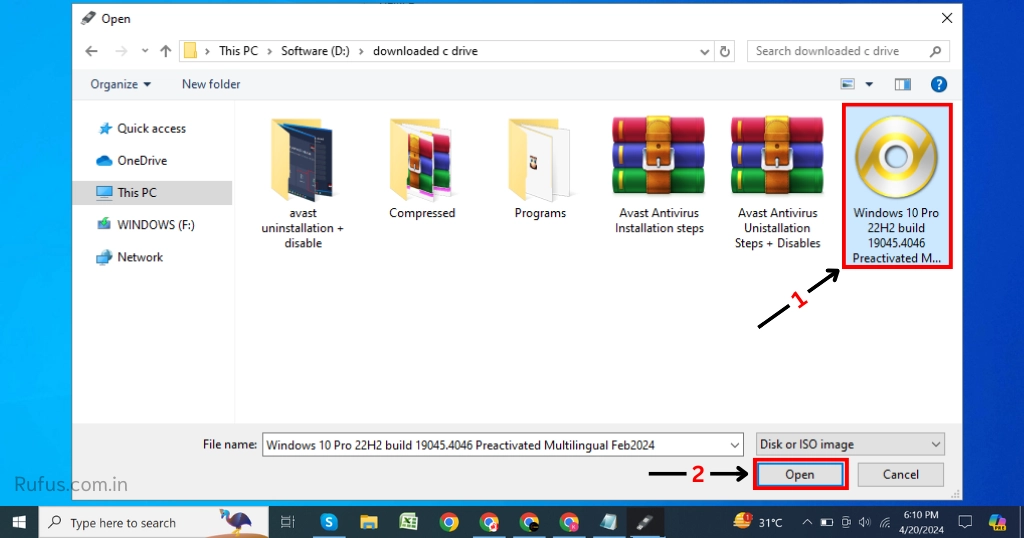
After that, you will have to select the Windows 10 ISO file, for this click on Select.
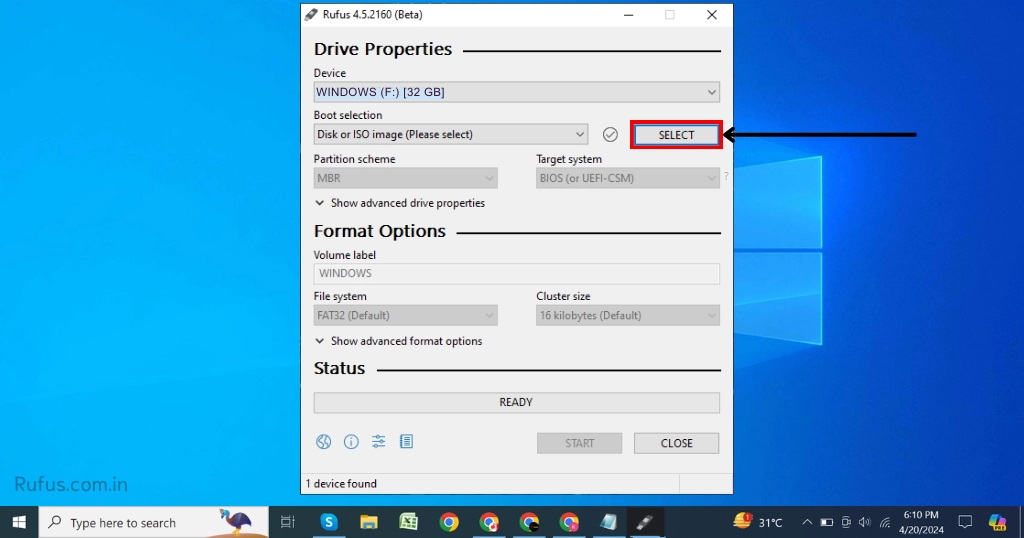
Windows directories will open up and from there search for the location of the ISO file and then click on “Open”.
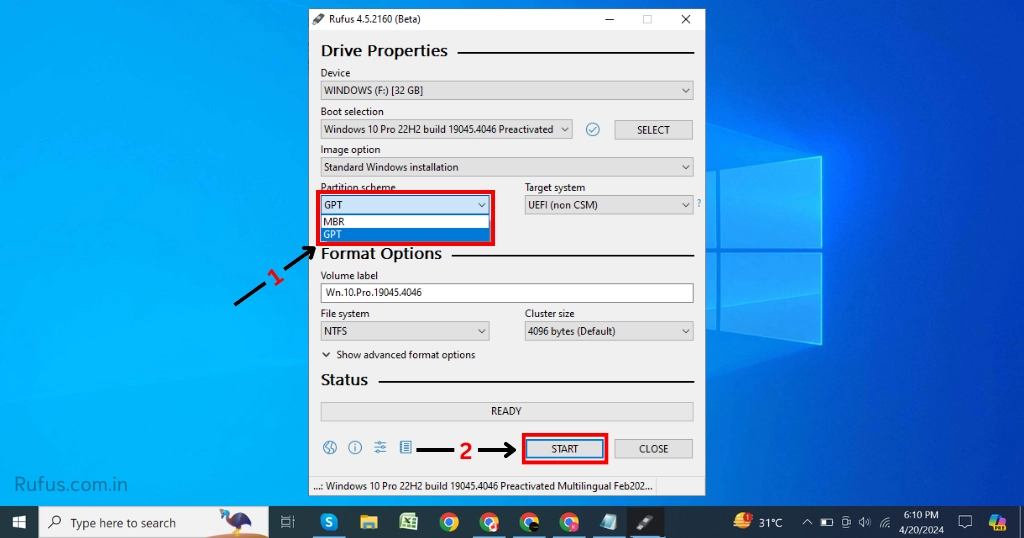
Then select the partition scheme (MBR or GPT). If you don’t know then check out: what is partition scheme in Rufus. However, in this case, we are selecting the GPT partition scheme. Then click on Start
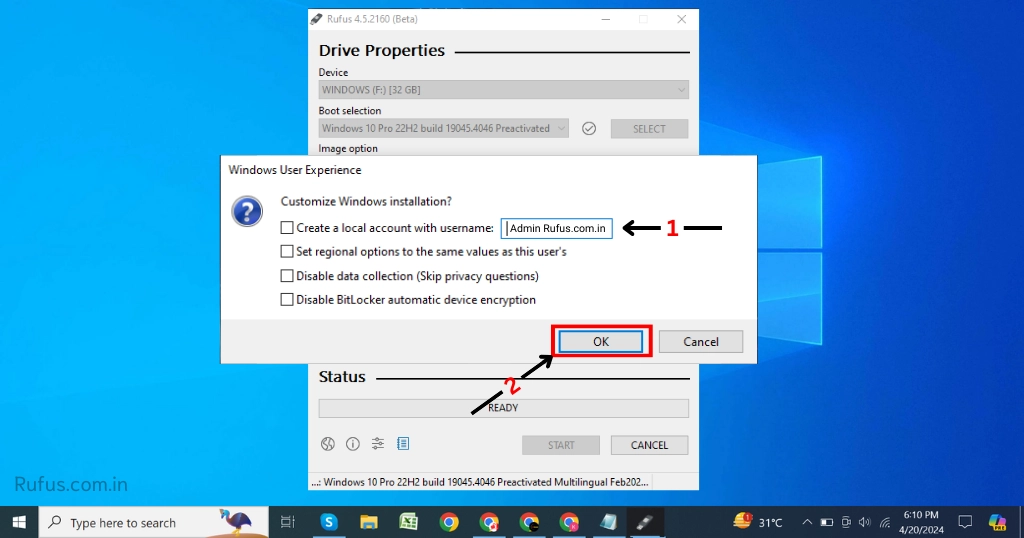
After that, a dialog box will appear (Windows User Experience) from there you can create a username and then click OK.
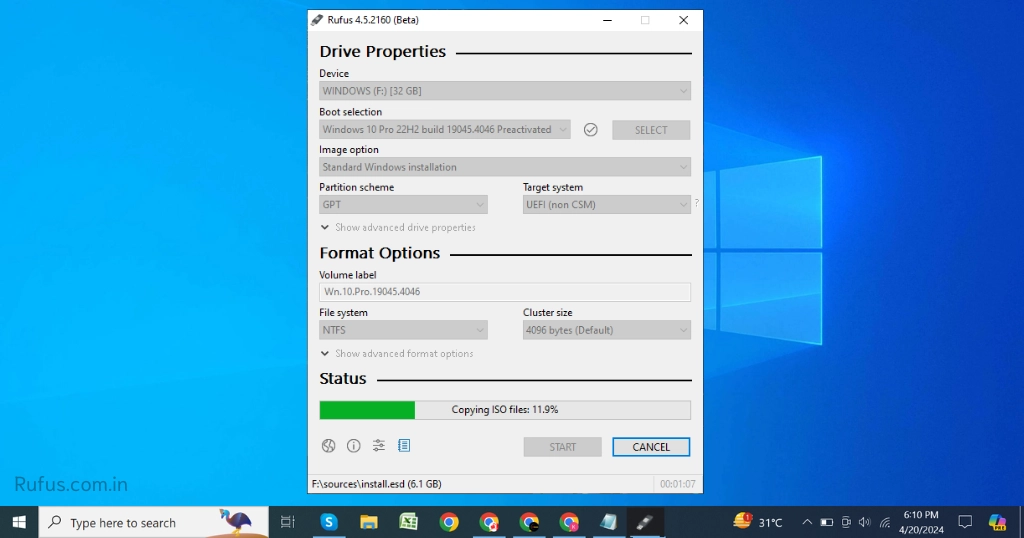
Then the program will give you a warning saying that all of your USB data will be deleted. Therefore, if you have some important data ensure that you make up a backup of that data.

The partition formatting will start and then the process of creating a bootable USB will start as well.
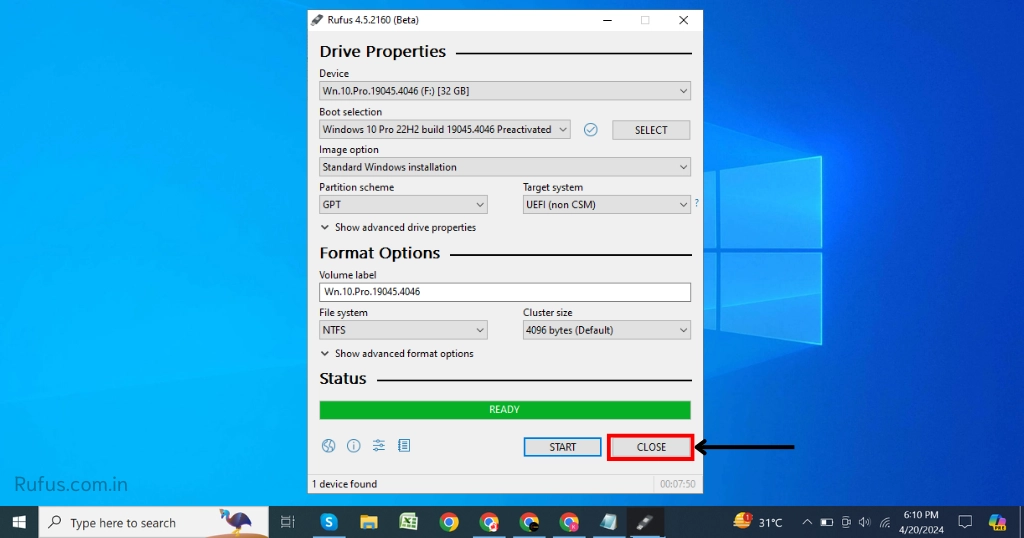
After that completing just click on “Close”.
Your Windows 10 Bootable USB Drive is created, therefore let’s move on to the installation process. We will break this down into two parts: 1) How to access the BIOS and 2) How to install Windows 10 from the bootable drive. Keep reading as we go into each topic in depth.
Part 1. Enter BIOS to Set USB as the Boot Device
Part 2. Install Windows 10
Part – 1. Enter BIOS to Set USB as the Boot Device
To start off the Windows 10 installation process on your PC, you need to access the BIOS to ensure your bootable drive is recognized. Getting into the BIOS involves pressing particular keys on your keyboard when starting up your computer. The exact keys to press depend on your computer model, but they typically include ESC, DEL, F2, or F10, either individually or sometimes in combination.
Step 1: After accessing BIOS, locate the “Boot menu” by navigating to either the “Advanced” or “System” configuration sections.
Step 2: Choose “USB drive” as your primary boot drive. You can achieve this by pressing the down arrow key and then hitting Enter to confirm your selection of the USB drive.
Step 3: Finally, save the changes you have made and exit the BIOS setup. Now, you are ready to move on to the next step, booting Windows from the USB drive.
Part – 2. Install Windows 10
So here, I will tell you how to install Windows 10 from USB on your PC:
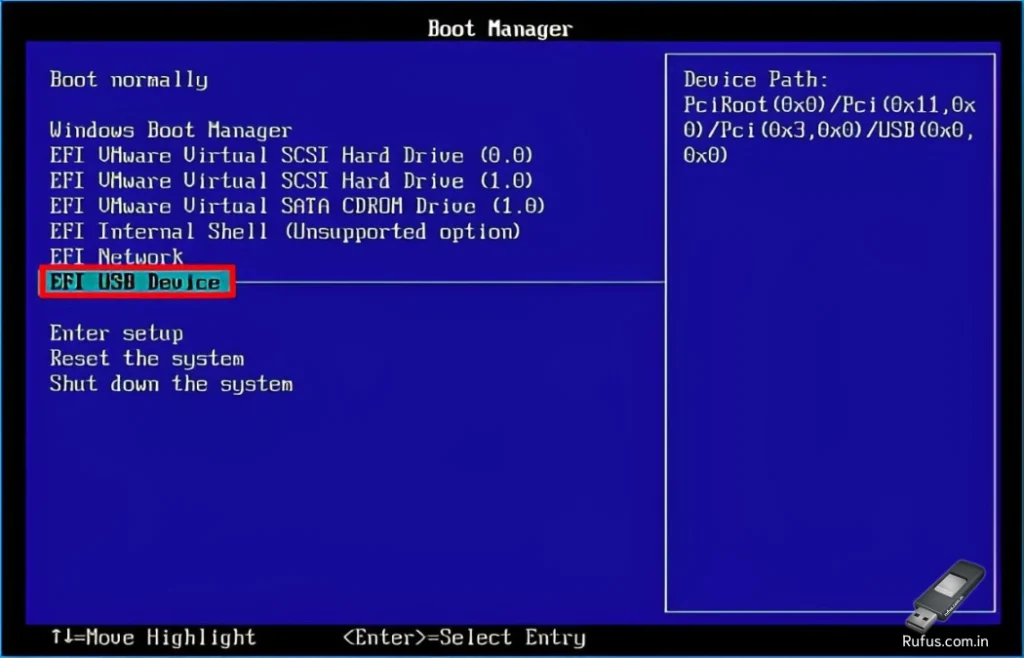
Step 1: First up, plug in that USB drive you made all bootable using Windows 10, into your PC. Then press that F9 key until the boot menu shows up. Then just pick your USB drive from the menu, and you will be in the Windows Setup zone, ready to install Windows 10.
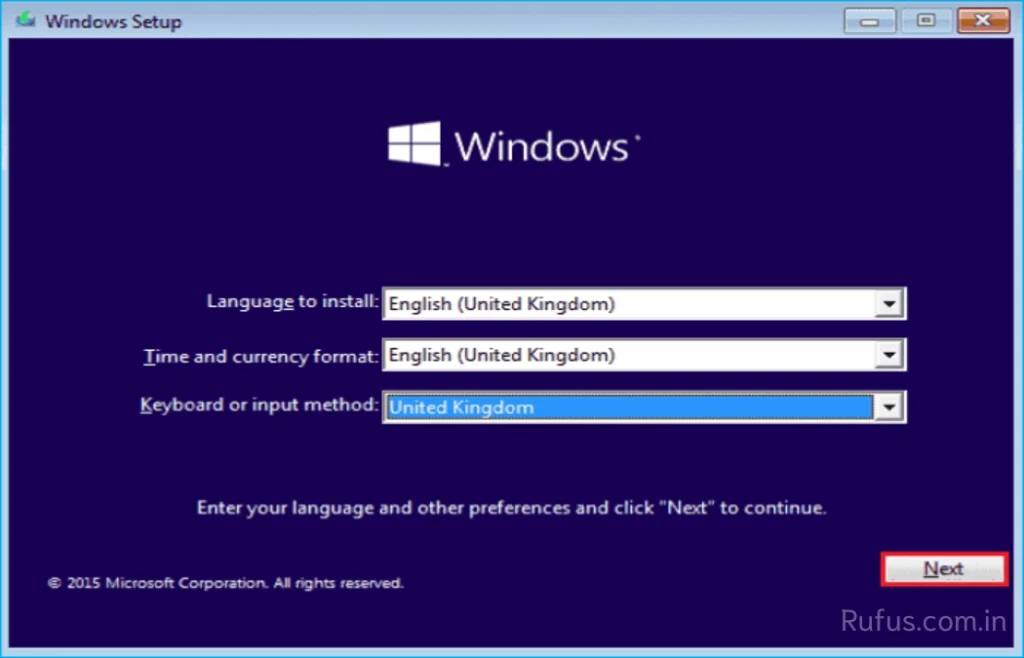
Step 2: When you see the Windows Setup screen appearing. You must pick your language and hit Next.
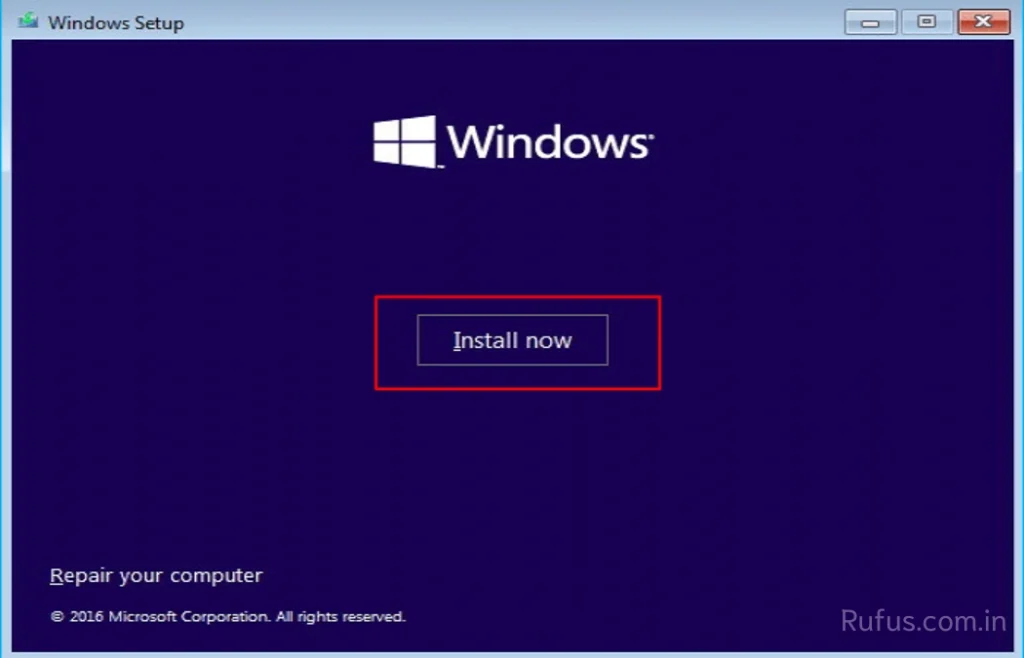
Step 3: Next, you will have to click on the “Install now” button displayed on the screen.
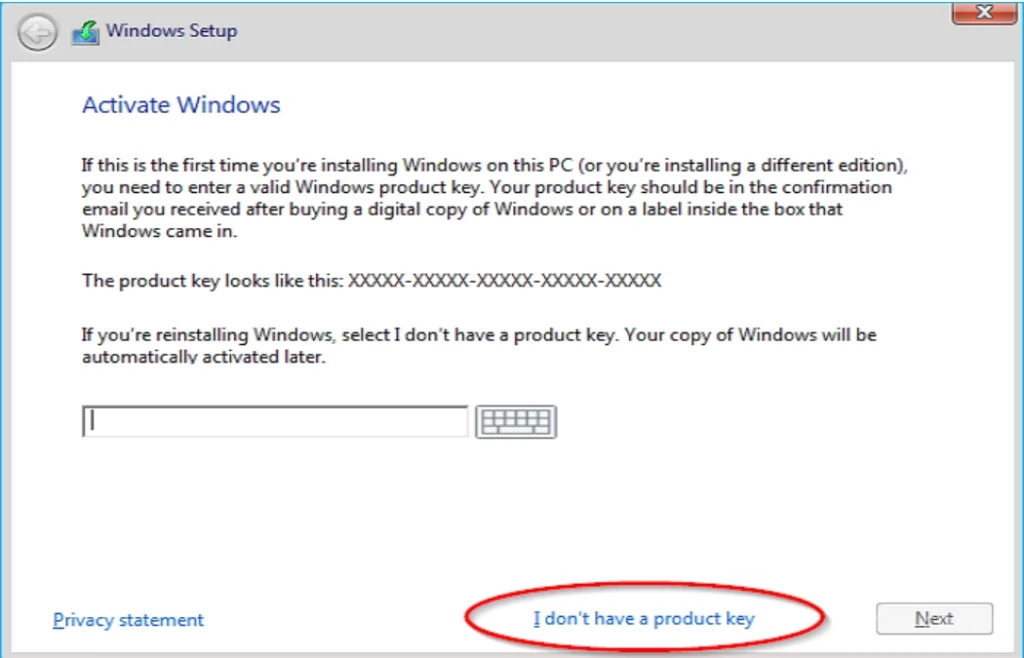
Step 4: Then the Windows will ask for a Windows 10 Product Key. Therefore, simply click on the option for “I don’t have a product key.”
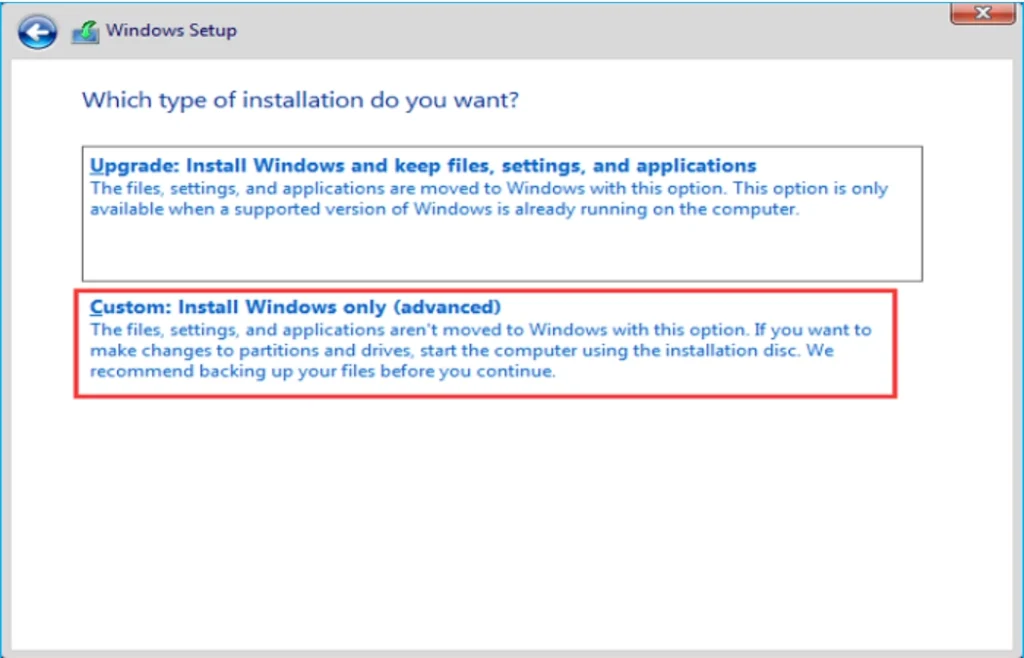
Step 5: After that, you will have to check the license terms box and click Next. Then, you will have to select the type of Windows Installation. Choose “Custom Install”.
Step 6: Now, select the drive on which you want to install your Windows, then click “New”, “Apply”, and “Next.”
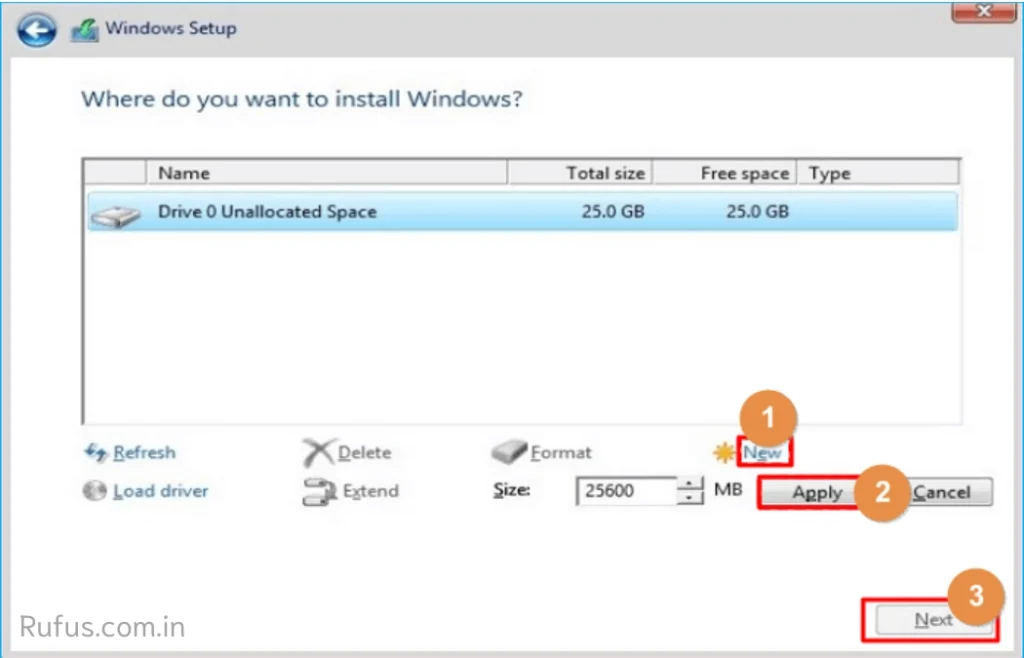
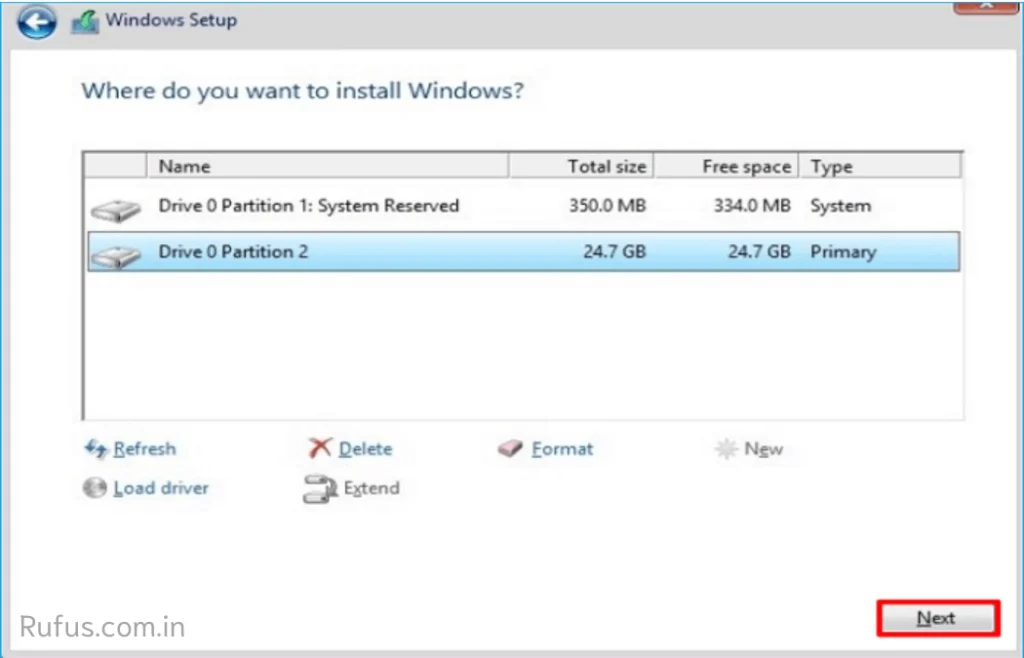
Step 7: Then you will have a new partition, and from there just choose the primary partition. Then click Next.
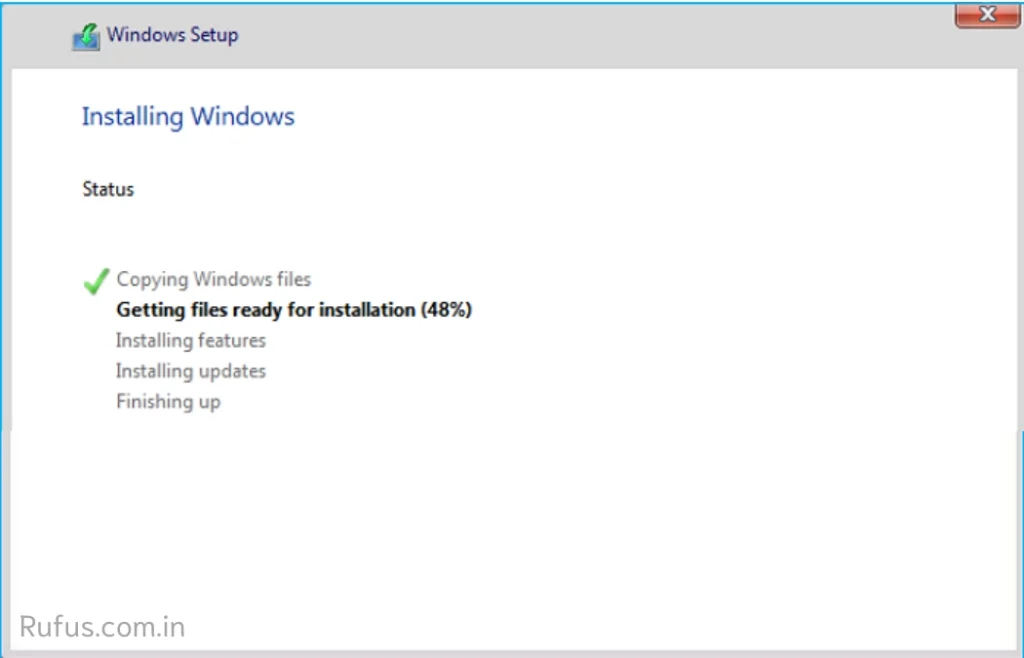
Step 8: After step 7, Windows 10 will start installing on the drive that you have selected. All you have to do is monitor your screen to check the percentage progress of the installation. The installation can take some time and when everything is done you will have a fresh new operating system.
Troubleshoot: Cannot Install Windows 10 from USB
When installing Windows 10 from installation media USB flash it is quite possible to encounter some issues. However, you may not worry as there there exist a couple of fixes you can apply to troubleshoot the problem. The most common problem that users face is that their BIOS has incorrect settings. Therefore, because of this incorrect setting, Windows may fail to install. So, you must crosscheck and make sure that you have set the USB drive as your primary boot.
Second, if your bootable drive isn’t listed in the Boot menu, yet you have selected it as the primary boot (in BIOS), then you must update your BIOS to the latest version from the device manufacturer’s website.
Lastly, Windows may also fail to install because of a corrupted USB drive. Therefore, to solve this you can simply format the drive or you can also use another drive to solve this. Follow these recommended options and I am sure that you will not have any problem with your Windows installation.
To Wrap Things Up
This blog article has shown you how to install Windows 10 from USB from BIOS. Before, Windows 10 installation you must have to fulfill some of the requirements such as having a USB drive of at least 8GB, a computer, and a stable internet connection.
One of the most recommended professional software that can help you create a bootable drive is Rufus. With this third-party tool, you can bypass the requirements that are necessary to meet before Windows 10 Installation. Make sure that you download it today in order to check how it works.